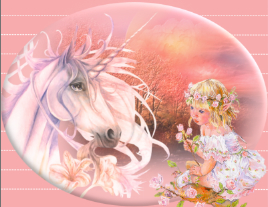
Unicorngirl
Styles Category you need to import before you begin. Here's how to do this:
The matrial can be downloaded here:

1. Create a new Document 800 x 625
2. Shapes:Rectangel ... Make a rectangel around your entire image
3. Go to Styles ... Category : Unicorngirl ... press Styles 1
4. In the Layer panel ... Right-click... Rasterise
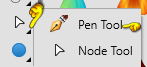
5. Node Tool  : ( Located in the same place as pen Tool )
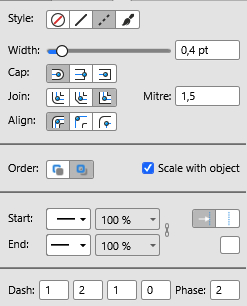
6. Press the box with the line
Set options like here below:
7. Pen Tool: press the little black triangle ... see yellow finger on the left
8. Press the edge of the left side ... then press on the right side
Now it should look like this:
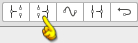
9. I Context linjen for oven ... tryk Close curve ... look at the yellow finger here below:
10. In Layer panel ... right click ... Duplicate
11. Move Tool: move the line down like here below::
12. Hold down CTRL and press J so many times that until the lines reach the bottom. The lines move de-tomatically downwards
13. In the Layer panel ... mark all layers with the lines ... right click ... Group
14. In the Layer panel press the group layer .... Rasterise & Trim
15. In the Layer panel ... Merge down. Now the two layers should be assembled in one layer
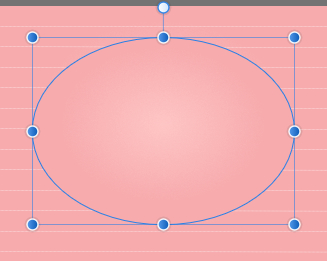
16. Shapes Ellipse Tool ... make a ellipse like here:
17. Go to Styles ... Category : Unicorngirl ... press on Styles 1
18. In Layer panel.... right click ... Rasterise
19. In Layer panel .... duplicate ... set layer ... Blend: Screen and opacity 20
20. In Layer panel ... right click ... Merge down
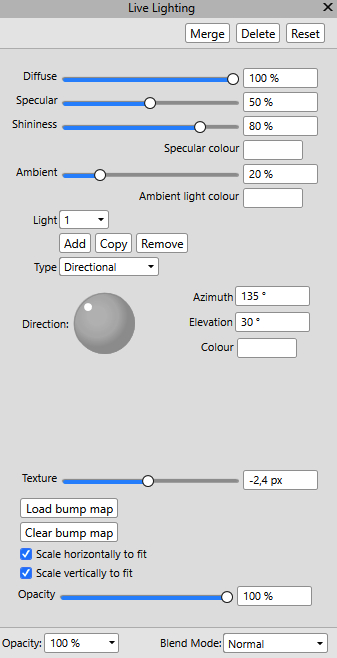
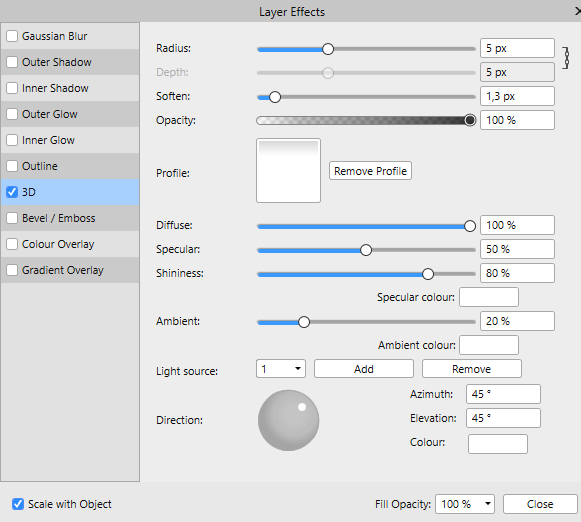
21. In Layer panel in the bottom ... press on fx ... check in 3D ... settings like here below:
22. Remember check in Scale with Object
23. Open file: 12-5-06cebarre2_sw ... right click ... Copy
24. Go to your work picture again... right click on it ... Paste
Resize with Move Tool ... put the tube in place
25. In Layer panel ... set layer Blend Mode: Hardlight
26. Go up in Filters ... Lighting ... set options like here below, and press Merge
27. In the Layer panel ... drag the layer down under the ellipse layer ... drop the layer just behind the small picture on the line
between the layers. See red dot:
28. Copy/Paste tube XBA~ Indigo Wake Unicorn Wind, in the same way as before
29. Arrange ... Flip Horizontal ... put the tube in place
30th With Move Tool ... resize the ellipsis
31. Thread unicorn made down under the layer with the ellipse as before
32. In the Layer panel ... set the layer Blend Mode ... multiply
33. Go to the layerpalet ... duplicate ... setch this layer Blend Mode... Luminocity
34. In the Layer panel at the bottom ... press eg ... set notch in 3D ... options like here below:
. Remember check in Scale with Object
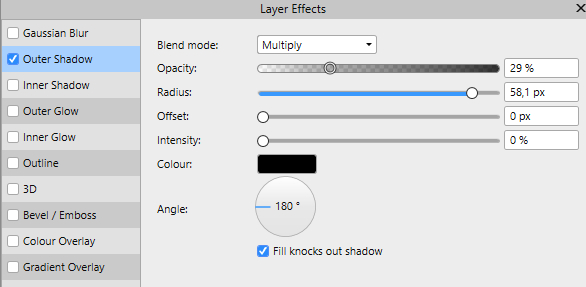
35. Copy/Paste tube FairyPoppet1-jc on , in the same way as before. Give the same Outer Shadow as before
36. In the layer panel ... Right-click... Merge Visible
37. In the layer panel ... Right-click... Duplicate
38. With Move Tool ... Drag the image over the edges so that the ellipse goes all the way to the edge, in all 4 pages, as here:
39. In Layer panel ... right click ... Rasterise
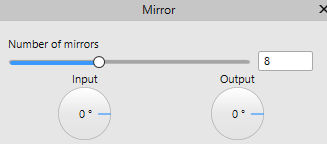
40. Go up in Filters ... Distort ... Mirror ... set number of mirrors to 8 and press Apply
41. go up in Select ... Select all
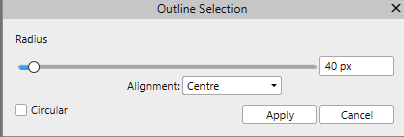
42. Go up in Select ... Outline ... set options as here below, and press Apply:
43. Go up i nSelect ... Invert Pixel selection
44. Press Delete on your key trip
45. Go up i Select ... Deselect
46. In Layer panel at the bottom ... press eg ... set notch in 3D ... options like here below:
Remember check in Scale with Object
47. Open the corner ... Copy/Paste to your picture ... move the corner at the place ii øverste venstre hjørne
48. Hold CTRL nede og tryk på j 1 gang, så du har to hjørner
49. Go up in Arrange ... Align right
50. Go up i Arrange: Flip Horizontal
51. In Layer panel... ... Merge Down
.52. Hold CTRL down and press on j one time
53. Go up in Arrange ... Align bottom
54. Arrange: Flip Vertical
55. Write your name and export to jpeg
Rehders-Design
©