
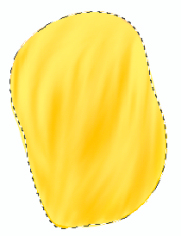
Daffodil

1. Open image Daffodil from the material
2. Stay on the layer : Petal1 ... go up in Select ... Selection from Layer
3. Flood Fill Tool: fill the selection with this color: FAE379
leave the selection until it says otherwise
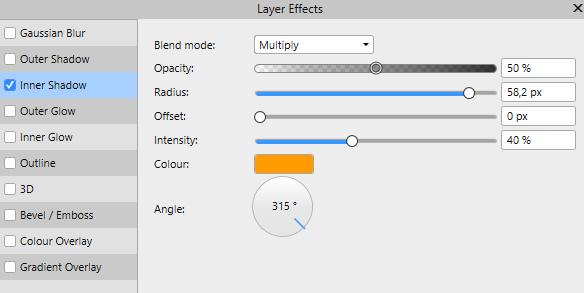
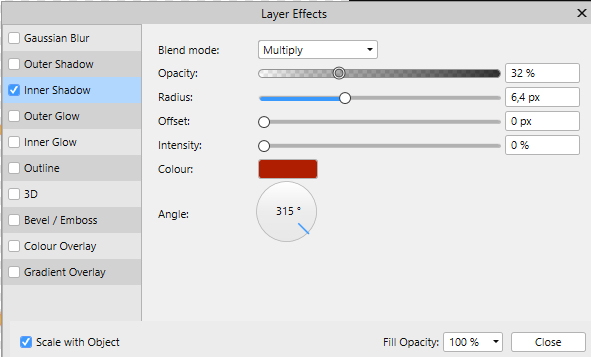
4. In the Layer Panel, in the bottom ... press at fx ... settings like here:
Remember check mark in : 
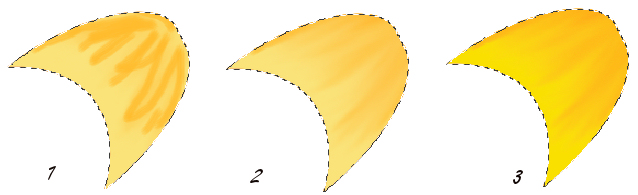
5. Create a new layer
6. Paint Brush Tool ... in Brushes Panel ... choose Category Rehder... select the one you see blu marking here below :
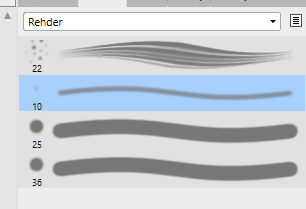
settings like here if they are not already there

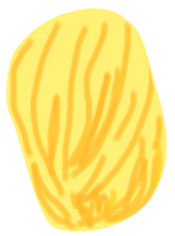
7. Draw some lines with this colour: FF9C00 ... like here:
8. Smudge Brush with the same brushes, but Options like here:

9. Smudge so it looks soft
10. In the layer panel: right click ... Merge Down

11. Create a new layer and set your colour to: FDF1BB
12. Paint brush Tool : set size down to 8 ... make some lines, as you see in the picture over here
13. Smudge so it looks soft
14. Layer panel ... right click ... merge down
15. Layerpanel... right click ... Duplicate
16. Layer pane : Blend mode: Color burn

17. Layer panel ... right click ... merge down
18. Layerpanel: stay on the layer: Edge Petal 1
19. Go up in Select ... Selection from layer
20. Flood FilleTool: fill selection with a lighter yellow color
21. Stay on the layer: Petal 2 ... Select ... Selection from layer
22. Do the same with the other 5 Petal layers, that you have done with
Follow from point 2 - 16
In brief:
Remember to go from one layer to another before you gets selections from the layers
Stand on the right layer
Selection from layer
Fill with colour: FAE379
Drop Shadows
new layer
Make dark lines: FF9C00
Smudge
Merge down
Nyew layer
Make bright lines: FDF1BB
Smudge
Merge down
Duplicate
Blend Mode Color Burn
Merge Down
23. Layer panel: mark all Petal layer, and Edge Petal layer... right click ... Group
24. Stay on the layer: Trumpet
25. Go up in Select ... Selection from Layer
26. Flood Fill Tool ... Fill the selection with this Colour: FB8328
27. Let sthe election stand
28. Paint Brush Tool ... Category Rehder... Options like here below choose brush 10:
29. Create a new layer. Draw some lines at the bottom of the trumpet with this color FAE379 ... see picture 1 below
30. Smudge Brush with same brushes, Options like here below:
31. Smudge so it looks soft, see printscreen 1 og 2 here below
32. Layer panel... right click... Duplicate ... the layer: Blend Mode: Colour Burn
33. Layer panel... right click ... Merge Down
34. Stay on the layer: Middle
.
35. Go up in Select ... Selection from layer
36. Flood Fill Tool ... Fill the selection with this colour: FFBB2B
Let the selection stand
37. Paint Brush Tool ... Category Rehder... vælg nr 10... Options like here below:
38. Create a new layer... draw lines down on the trumpet with this colour: ffbc2c
39. Smudge Brush with same brushes, Options like here below:
40. Smudge so it looks soft, look printscreen here below

41. Layerpanelet ... right click... Duplicate ... the layer Blend Mode: Colour Burn
42. Layer panel ... right click ... Merge Down
43. Stay dig on the layer: Middle Shadow
44. Go up in Select ... Selection from layer

45. Flood Fill Tool ... Fill the selection with this colour:D42D02
Set the layer Blend Mode: Hardlight
46. Go up in Select ... Deselect
47. Set stigma on the trumpet :
48. Layer panel: stay on the layer: Middlering
49. Go up in Select ... Selection from layer
50. Flood Fill Tool ... Fill the selection with this colour: FAA428
51. Press on fx in the bottom of the Layer panel
Check mark in Inner Shadow og press in the selection ... Settings like here below
Remember checkmark into Scale with Object Colour: AF1E01
52. Export as png so you can use the flower again
Rehders-Design
©