
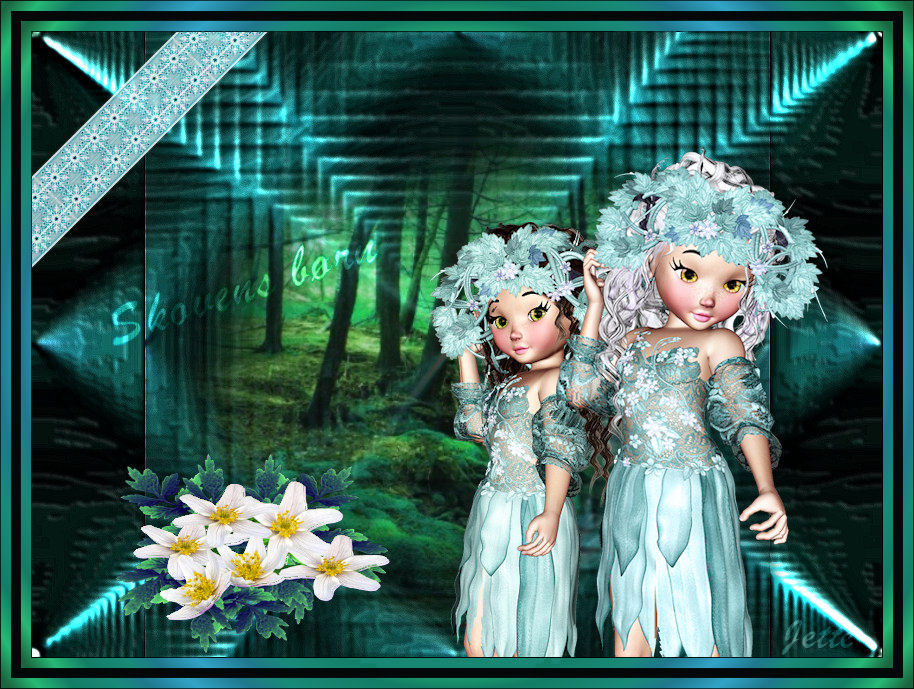
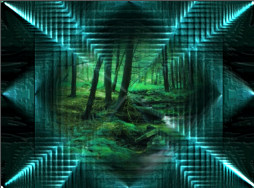
Forest children
The material can be downloaded here: 
These files below are the material + a Gradient:

Open the tubes in Paint Shop Pro
Gradients The gradient should be in the folder: Documents \ Corel Paint Shop Pro \ 17.0 \ Gradients
in older PSP: The gradient should be imported
1. Create a new image 850x625. This image we call your work picture
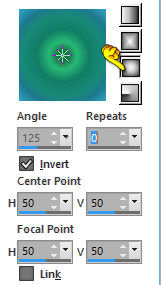
2. Go to the color palette and Gradients ... find gradient: swansea ... settings like here:
and press ok
3. Flood Fill: fill your image with the gradient
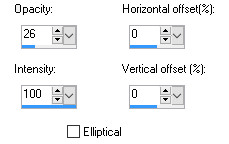
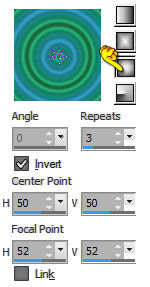
4. Go up to Effects ... reflection Effects ... feedback ... settings like here
and press ok
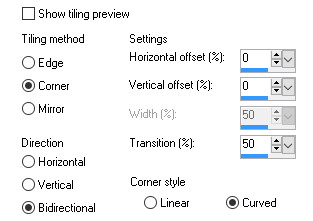
5. Go up to Effects ... Image Effects ... Seamless Tiling ... settings
as below and press ok
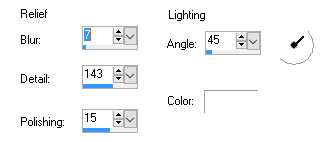
6. Go up to Effects ... Texture Effects ... Polised Stone ... settings
as below and press ok
7. Go up to Adjust ... Blur ... Gausian Blur ... Set the Radius to 2
8. Go to Layer Palette ... Right-click the layer ... Duplicate
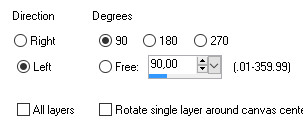
9. Go up in Image ... Free Rotate ... settings as below and press ok:
10. Go to the layer palette ... Set the layer Opacity about 50
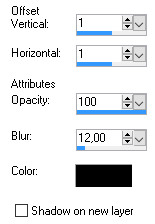
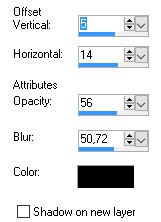
11. Go up to Effects ... 3D Effects ... Drop Shadows ... settings as below and press ok
black color
12. Go up to Drop Shadows again, but with a minus in front of the ones are in vertical and Horizontal
13. Go to Layer Palette ... Right-click the layer ... Merge Visible
14. . Go up to Adjust ... Brightness and Contrast ... Fill Light / Clarity ... Set Fill Light to 0 and Clarity to 127
(in older PSP: Adjust ... Brightness and Contrast ... Clarify 5)
15. Go up to Effects ... Edge Effect ... Enchance
16. Go to Layer Palette ... Right-click the layer ... Duplicate
17. Stay in the Layer Palette ... set layer Blend Mode: Dodge
18. Go to Layer Palette ... Right-click the layer ... Merge Visible
19. Open the tube with trees ... Right in the bar at the top of the tube ... press Copy in what appears
20. Go over your working image ... Right in the bar at the top ... press Paste as new layer
21. Take Pick Tool:  ... Drag out into the squares in the middle of the sides to fill
... Drag out into the squares in the middle of the sides to fill square in the middle as below:
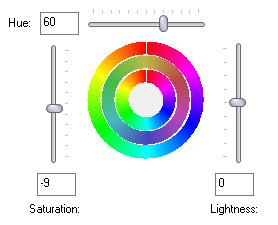
22. Go up to Adjust ... Hue and Saturation ... Hue / Saturation / Lightness
Press the little black notch at the top ... set it to default

set the other settings as below and press ok:
23. Go Layer Palette ... set the layer opacity to about 70
24. Stay in the Layer Palette ... right click ... Merge Visible
25. Open the tube with the girl with the dark hair ... Right in the bar at the top of the tube ... press Copy in what appears
26. Go over your working image ... Right in the bar at the top ... press: Paste as new layer
27. Go up to Effects ... 3D Effect ... Drop Shadows ... set of options, as below and press ok
black color
28. Put the tube with the girl with white hair on the picture ... the same way as in paragraphs 25 and 26
29. Give the same Drop Shadow as before (paragraph 27)
30. Place the tube with the flower on the image in the same way as before
31. Give the same Drop Shadow as before
32. Put the lace in the upper left corner
33. Check the tubes sitting on their seats, or jerk them in place
34. Put the white color of the background color and close the foreground color. Find fonten Brussels, Find the font Brussels,
Skriv dit navn, som du ser på mit færdige billede. Write your name as you look at my finished image.

35. Go to Layer Palette ... set layer Blend Mode: Overlay or another blend mode.
You can use the tube text inherent in the material, if you can not get it to look like with my Blend Mode.
36. Go up in Image ... Add Borders ... black ... 1 pixel ... notch in symmetric
37. Go up in Image ... Add Borders 10 pixels red color
38. Take Magic wand ... press in the red table
39. Go to the color palette and Gradients ... find gradient: swansea ... and change to these settings as below:
40. Fill the selection with the gradient
41. Go up to Selections ... Select None
42. Put your name on the picture
43. Go up to Image ... Add Borders 10 pixels ... black color
44. Go up to Add Borders 10 pixels ... red color
45. Take Magic wand ... press in the red table
46. Go to the color palette and Gradients ... find gradient: swansea ... Fill the selection with the gradient
47. Go up to Selections ... Select None
48. Go up in Image ... Add Borders ... black ... 1 pixel
Rehders-Design
©